Friday, 26 April 2013

EGGPLANT AND TOMATO CURRY

I chanced upon this big eggplant in my vegetable basket that was bought for making a Bharta but now I made other plans for it!

This recipe is a combination of Bengali and South Indian styles of cooking and does not involve too many exotic ingredients. It is my way of presenting the humble eggplant in the form of a colourful and very tasty curry…..

Eggplant or brinjal has many nutritional benefits. It is not only a good source of fiber but has a high water content too.


EGGPLANT AND TOMATO CURRY                                             Serves 4


Ingredients
Eggplant/Brinjal – 1 large
Tomato – 2 large (paste)
Curry leaves – 8 to 10
Ginger – 1 tsp (grated)
Green chilli – 1 chopped finely
Asafetida/Hing – a large pinch
Mustard seeds – ¾ tsp
Cumin seed – ½ tsp
Cumin pdr – ½ tsp
Coriander pdr – 1tsp 
Turmeric pdr – ¼ tsp
Jaggery (grated)  – 1 tsp
Salt – to taste
Coriander leaves – for garnish
Oil – 1 1/2 tblsp + for deep frying
Water – 1 cup

Method
  1. Cut the eggplant into large pieces – quarter lengthwise and then into ½ inch thick slices. (You may cut them smaller.)
  2. Heat some oil in a  pan. Fry the eggplant pieces in it on high heat. 
  3. Heat the remaining oil in a pan and add the mustard seeds followed by the cumin seeds. Add the curry leaves only after the mustard has stopped popping.
  4. Once the curry leaves release their aroma, add the tomato paste followed by the ginger and green chilli. Cook for 2 minutes.
  5. Now, add the pdr spices and cook till oil separates. Add in water. Bring to a boil.
  6. Add the fried eggplant pieces to the gravy, season with salt and jaggery and mix lightly and thoroughly.
  7.  Lower the flame and cover the pan. Cook for about a  minute so that the curry comes together.
  8. Garnish with chopped coriander and serve hot with any bread or rice.

© Rinki’s Kitchen 2013

Monday, 15 April 2013

Firni ..... a delicate and easy to make dessert


This is festival time in India…. Many regions celebrate the NEW YEAR around this time.

The festival celebrates the harvesting of crops. So, it is Vishu, Baisakhi, Ugadi, Bohag Bihu, Gudi Pawa, Poila Boishakh…..

Harvesting time usually centers around food, food and food. Every region has its specialties to offer. But I guess the common food factor everywhere remains the dessert.

At this time of the year it has to be something made out of rice.

Making the perfect Payesh or Payasam requires a lot of time…..so without breaking away from tradition you can cook up the perfect rice dessert in the form of FIRNI.

It is very light and delicate…. I’m sure you will enjoy making it too.

Wishing you a wonderful year ahead…..


FIRNI                                                                                      Serves 6 – 8
Ingredients

Milk – 1 litre and a little for the saffron
Basmati Rice – 6 tblsp (you may use any other fragrant rice)
Sugar – 6 to 8 tblsp
Saffron – a pinch of strands
Kewra flavouring – a few drops
Almonds – 12 pieces chopped (a few whole for decoration)
Edible silver foil – one leaf

Method
  1. Soak the rice in water for about 20 mins and then grind it to a coarse paste. Keep it aside.
  2. Warm a little milk and soak the strands of saffron in it to release the flavour and colour.
  3. Pour the milk ( 1 litre)  into a thick bottomed pan and bring it to the boil.
  4. Boil it for about 15 mins on low heat.
  5. Add the rice paste to the milk while whisking it so that no lumps are formed. Cook stirring constantly over low/medium heat till the milk thickens to a nice custard consistency.
  6. Add the sugar at this stage 4 tblsp to begin with. Check the sweetness and add more if you so desire. Remember that Firni is mildly sweet.
  7. Once the sugar is incorporated add the saffron into the custard. Mix thoroughly and take it off the heat.
  8. Cool the firni to room temperature before adding the kewra drops.
  9. Add the almonds at this stage and mix well.
Pour into a serving bowl and decorate with whole almonds, saffron strands and edible silver foil. Chill in the refrigerator before serving.


Note:
If you don't have Kewra flavouring just add Rose water or flavouring instead.

You may soak the almonds in water for a few hours and peel them before chopping.

Serve in terracotta bowls to add drama.

© Rinki’s Kitchen 2013

Wednesday, 10 April 2013

Jalfrezi....

Vegetable jalfrezi is a dry, tangy ,mildly flavoured curry which is quite versatile. Its colourful appearance makes it appealing too.

You can really combine your own choice of vegetables to give it a signature.... for the vegan version you may substitute the paneer/cottage cheese with tofu....
There is no restriction on the variety you use either... mushroom, sweet corn, cauliflower, bell peppers of different coulours ... take your pick.

I like to slightly under cook the veggies to add that mild crunch....


VEGETABLE JALFREZI                                                      Serves 6 - 8
Ingredients
French beans, Carrot, Baby Corn – 1cup each (cut into long pieces)        
Peas – 1 cup
Bell peppers (long pieces) – ½ cup
Onion – 1 large (sliced)
Paneer/ cottage cheese - ¾ cup (diced)
Tomato puree – 3tbsp
Chopped green chillies – as per taste
Ginger (grated) – 1 tsp
Garlic – 2 cloves chopped finely
Coriander pdr – 1 tsp
Cumin pdr – ½ tsp
Whole cumin – ½ tsp
Garam masala pdr – ½ tsp
Chaat masala – ½ tsp
Haldi/Turmeric – a pinch
Tomato ketchup – 1tblsp
Vinegar – 1 tblsp
Vegetable oil – 2 tblsp
Salt – to taste
Fresh coriander leaves – for garnish

Method
  1. Parboil / Steam the carrot, beans, peas and baby corn and keep aside. Remember not to cook them through.
  2. Heat oil in a pan and add the whole cumin. Reduce the heat to medium.
  3. Add the onions and stir fry them till translucent.
  4. Add the tomato puree followed by the chopped chillies, ginger and garlic. Cook for a few seconds before adding the pdr coriander, cumin, garam masala and haldi. Sprinkle a little water and cook till oil seperates.
  5. Now add the bell peppers and tomato ketchup and cook for a minute. Add the steamed veggies season with salt and cook stirring constantly.
  6. Once the vegetables are combined thoroughly, add the paneer pieces. Sprinkle chaat masala and mix lightly. Cover for a minute.
  7. Finally add the vinegar and combine it. Garnish with coriander leaves and serve hot with chapatti, tortilla or paratha.


Note: It is a good idea to pack a jalfrezi chapati / tortilla roll in the lunch box.

© Rinki’s Kitchen

Wednesday, 3 April 2013

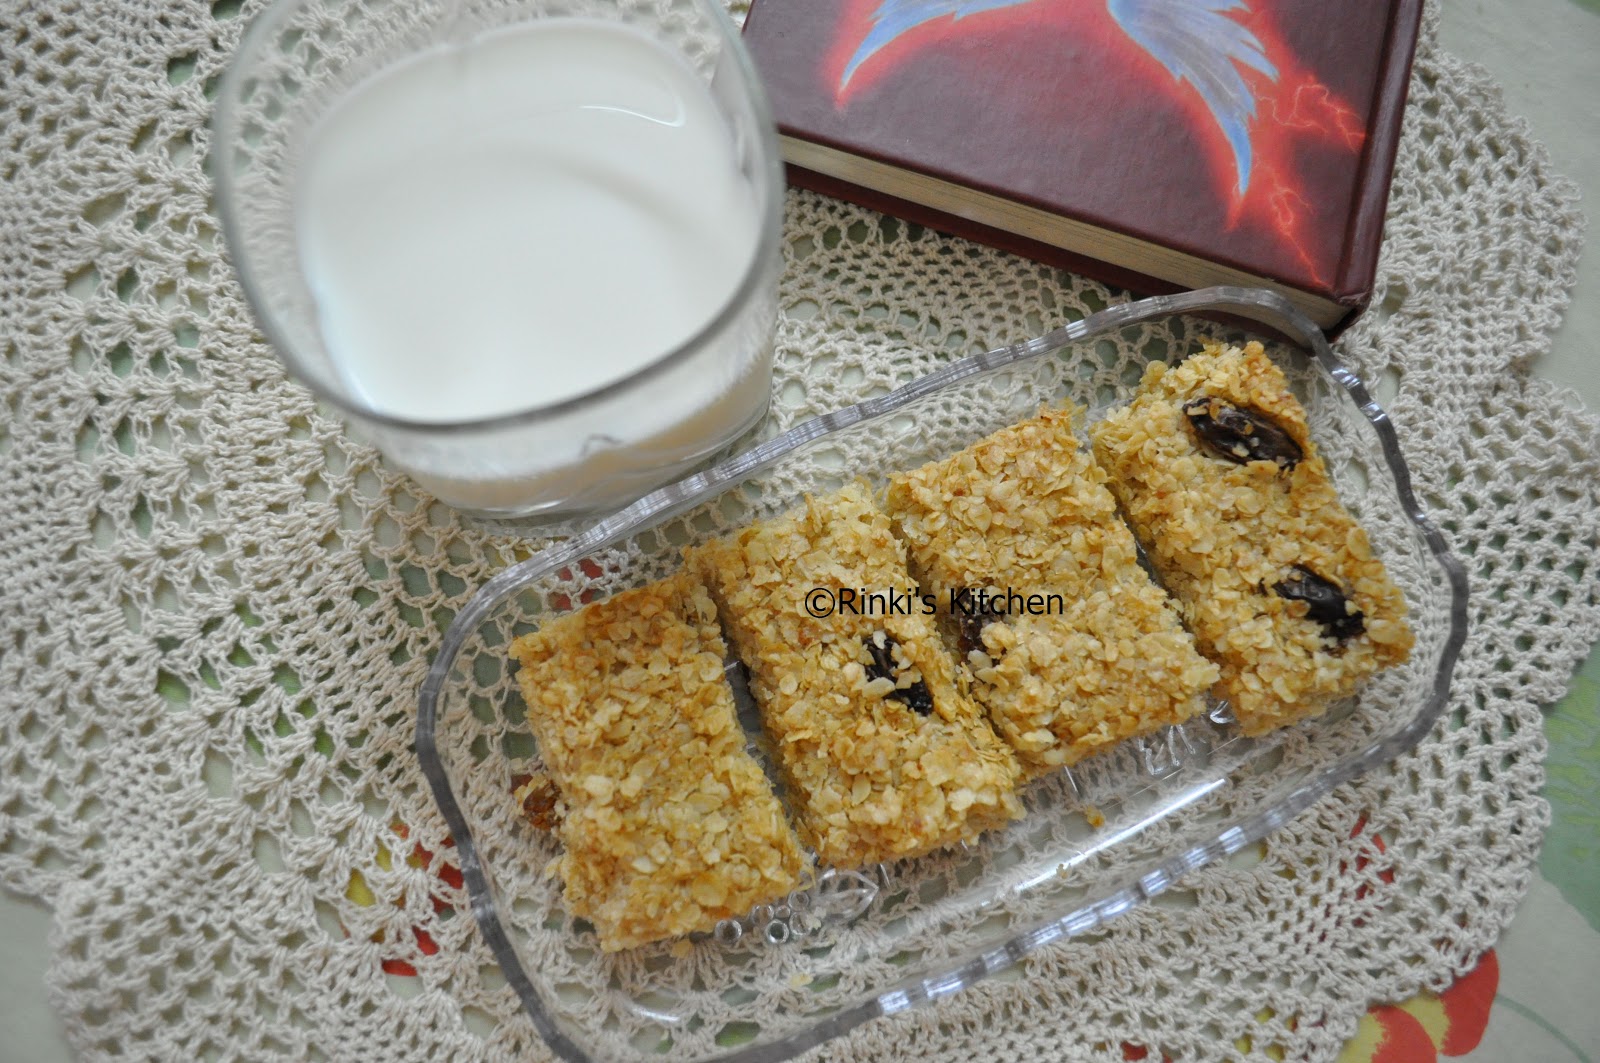
Raisin Flapjacks

My Dear Viewer,  I return to my blog with a very simple recipe which I am sure you will try out. 

The British Flapjacks are made with oats, honey/golden syrup, sugar and butter. Oats as we all know are beneficial for our health. They are loaded with iron, vitamin B and zinc. Throw in some nuts or dried fruits and you have a winner combination.

 Kids will just love this one. If you are too concerned about the calories, then why don’t you cut yourself a smaller piece?

This recipe takes about 25 minutes to cook and is a perfect combination with milk/coffee/tea/cream.
Let me tell you that the smell of freshly baked flapjacks is just irresistible!


FLAPJACKS                                                                         Makes 12 – 16

Ingredients
Oats (flattened) – 2 level cups
Castor Sugar – ½  cup
Honey – 3 tblsp
Butter(salted) – 100gms melted
Raisins – ¾ cup

Method
  1. Mix together the oats, sugar and raisins.
  2. Pour in the melted butter and combine thoroughtly.
  3. Preheat the oven to 180°C.
  4. Grease a flat baking dish/tray lightly.
  5. Pour in the oats mix and press down tightly with the back of a spoon.
  6. Bake for 12 minutes till the top is slightly coloured.
  7. Remove from the oven and cut out the flapjacks while still hot and soft. Let it cool slightly.
  8. Arrange the flapjacks on a wire rack to cool thoroughly. They will toughen up on cooling.

Note: 1. You may replace the sugar with 2 tblsp of honey or golden syrup.
2. I have used salted butter as this lends a special taste to the flapjacks.
3. You may choose to replace it with unsalted butter.

© Rinki’s Kitchen 2012

Tuesday, 13 November 2012

Semiya Kheer.....

Happy Diwali … May the festival of lights enlighten your life and bring prosperity…


In the age of thriving sweet shops and the numerous varieties on offer, the tradition of making sweets at home is gradually on the decline. The traditional making of family favourites -  gujia, malpua and halwa have become elaborate rituals in the kitchen and are slowly being replaced by their ready made versions.

Today I bring to you a very easy to make sweet dish recipe that can be served up in no time!


SEMIYA KHEER/VERMICELLI PUDDING                                       Serves 6 - 8

Ingredients
Semiya/Vermicelli – ½ cup
Milk – 1 ½ litre
Khoya/Mawa/Reduced dry milk – 150 gm
Ghee – 4 tbsp
Sugar – about 6 tblsp
Raisins – ½ cup
Cashew nuts – ½ cup

Method
  1. Reduce the milk to about a litre by boiling on low heat. (You could do this in the microwave by boiling it for 15 – 20 mins on full power.)
  2. Heat the ghee in a thick bottomed pan and add the semiya/vermicelli. Fry on low heat till lightly coloured. Add the raisins and fry till they puff up.
  3. Pour in the milk and cook on low-medium heat till the vermicelli is cooked and rise to the surface. Add the crumbled Khoya/Mawa and the sugar.
  4. Cook for a minute till the sugar and khoya are thoroughly combined.
  5. Sprinkle with chopped nuts and serve warm.

Note: If the semiya has not soaked in enough milk while cooking, the kheer will thicken later. You could add some warm milk and mix it up well to get the right consistency.

© Rinki’s Kitchen 2012

Sunday, 4 November 2012

Dates and Nuts stuffed pastry strips.......

After the really long break from the blog…..I am back with a dessert recipe. Dried fruits and nuts are ideal for the festive season and so I bring to you a recipe which has loads of them. I came across this recipe in a book on baking….but have modified it to my taste. Try it to make an impression on your loved ones…..


DATE STUFFED PASTRY STRIPS                                                  Serves 10 - 12

Ingredients

For the pastry
Plain flour(Maida) – 2 cups heaped
Butter (cubed small) – about 100 gms
Caster sugar – ¾ cup
Cold water – a few tblsp

For the filling
Dates (pitted and chopped) – 1 cup heaped
Nuts (Cashew and almonds roasted and chopped) – ¾ cup
Lemon juice – 2 tblsp
Honey/Golden syrup – 2 tblsp
Water – 3 tblsp

Method
  1. Put in all the ingredients – dates, lemon juice, honey and water in a pan and put it on medium flame.
  2. Cover and cook till the dates are soft. Mash lightly.
  3. Alternatively you could cook the dates in a microwave. Cover and cook on high power for 5 mins.
  4. Let it cool thoroughly. Then add the nuts and mix well.
  5. For the pastry, mix the butter cubes into the flour and sugar mix by working with the finger tips.
  6. When the mix resembles breadcrumbs, add a few tablespoons of chilled water to bring the mix together in the form of dough.
  7. Put the dough in an airtight container and let it rest for 20 – 30 mins in a refrigerator.
  8. Split the dough into two parts. Roll out into rectangles of equal size ½ “thick.
  9. Place one rectangle on a baking tray / dish.
  10. Spread the date mixture evenly on the pastry sheet. Cover with the other sheet and seal the edges.
  11. Make markings on the pastry about ¾” wide. Go all the way down. It becomes easier to cut the strips after it is cooked.
  12. Brush with milk and bake for 20 -25 mins or till golden in a preheated oven at  180 - 200°C.
  13. Brush with honey and cool on a wire rack.


    Serve warm with a scoop of vanilla ice-cream for the special effect.

    © Rinki’s Kitchen 2012

    Sunday, 5 August 2012

    A microwave cake recipe.....

    HAPPY FRIENDSHIP DAY! Here is a chocolate cake for all your friends.

    This cake finds regular feature in my son’s lunch box. at the evening tea and for all our road trips.

    I have arrived at it by trial and error method. It was quite a challenge for me to bake ‘the perfect microwave cake’ when the gadget entered my kitchen more than a decade ago.
    Now, I can proudly claim this to be it.

    You too will love the moist and soft cake for sure……..
    https://www.youtube.com/watch?v=bUG8zIDdWpg

    QUICK CHOCOLATE CAKE                                    Serves 6

    Ingredients

    Refined flour/Maida – 1 cup
    Cocoa pdr – 3 tblsp
    Baking pdr – ½ tsp
    Baking soda – ½ tsp
    Salt – a pinch
    Eggs – 2
    Sugar – ¾ cup
    Butter – 50 gm
    Oil – 50 gm
    Curd / buttermilk – ½ cup
    Vanilla essence – 1 tsp
    Milk - 3 to 4 tblsp

    Method
    1. Mix together the flour, cocoa pdr, baking pdr, baking soda and salt thoroughly by passing through a sieve (at least thrice).
    2. Beat the butter, oil and sugar till light and creamy.
    3. Add in the eggs and beat till combined.
    4. Now fold in the dry ingredients mix and buttermilk alternately in 3 parts. Add a little milk if the batter is too thick.
    5. Add the essence of vanilla and mix lightly.
    6. Grease a 6” baking dish and dust it with flour.
    7. Pour in the cake batter and tap the baking dish lightly to remove unwanted air bubbles.
    8. Bake at full power for 5 – 6 mins.
    9. Cool on a wire rack, cut into pieces and serve with a drizzling of chocolate sauce for that extra effect.

    © Rinki’s Kitchen 2012